
Hackle or material guards help you keep stuff out of the way while you tie or varnish your fly
Once in a while you bump into a tool or a tying method, which makes you go "Duh! How simple. I could have invented that...". That's how I felt with hackle guards many years ago.
A hackle or material guard will hold a material under control while you varnish or tie in other materials. It's a simple tool that comes in many forms.

It's one of those tools and tying methods that are surprisingly simple, yet ingenious and very useful. When I tie certain patterns, I sometimes have problems with materials that I already tied in getting in the way for new materials, varnish or whatever comes next.
A hackle or material guard will help keep stuff out of the way while tying or varnishing a fly.
Fingers vs. tool
What most tyers do, is to stroke back whatever is in the way, and hold it there with one hand, and then tie in whatever comes next. But that occupies a hand – or at least some fingers – and keeps you from doing more intricate tying steps, which require both hands.
Sometimes you can moisten the material and let it collapse and stick a bit. That works well for softer hackles, hair wings and other materials that get soggy when wet. But stiff hackles, many synthetics, not to mention such unruly appendixes as rubber legs, aren't easily tamed by a bit of moisture. It takes more convincing methods.
That's where the hackle guard comes in.
You simply slip the tool over the front of the fly, let it squeeze down the material where you want it and let go. Et violà! The materials stay there until you are done, the varnish is dry or whatever next step you need to finish.


The simple DIY way
We have had an article online about one of the simplest DIY versions for many years, Alan Bithell's rubber band tool, published in 2013.
This is almost as simple and inexpensive as it can get: a plain household rubber band pulled through a narrow tube like a straw. You can see in the article how to make it and use it. If the rubber band is long enough, it can slip over the whole bobbin holder and up to the fly, and be removed the opposite way when done.
The even simpler version is a short piece of tube, like a piece of a drinking straw. This is too small to pass over the bobbin holder, so you simply pull it over the bobbin holder tube before starting the thread. You can also slit open in one side. That enables it to slip over the thread and up over the head of the fly. It lets the thread go through the slit and then squeezes down the material it traps. It doesn’t offer the strongest hold, but will work fine for soft materials and hackles.
Both these tools can be made in under a minute with basically no work or expenses. The latter one is so cheap that you can make it disposable. Once used, you simply clip it open, remove it and discard it.

The O-ring
If you want something just a bit more fancy or need something with a little more heft than a piece of straw, you can use small rubber O-rings.
Simply slip one over the tube of the bobbin holder before you start tying. Once you need to tame a material, you pull up the small rubber ring and slide it over the eye of the hook and onto the fly.
If you need to remove it underway, you can pull it forward and back to the bobbin holder, or you can remove it once the fly is done and dry.
Another option is to remove the hook from the vise, and slip the ring all the way down the fly and around the hook bend. This of course requires that the ring is large enough to pass over all the materials already tied in. Or that the fly is small enough ...
Rubber glove fingertips
If your flies are larger than average, like large saltwater streamers or pike flies, you may need even more holding power, and in that case the tip of a finger from a rubber glove is a neat solution.
I saw this first recommended in Norwegian Staffan Lindstrøm’s 1996 book “Fluebinding” (Fly Tying), which is a small, home made tying book printed on loose pages.
In this Staffan shows how to cut off the tip of a “dish washing glove” as he calls it – a rubber glove in other words. Thinner Latex gloves for one time use can also be used, but aren’t quite as strong.
Once a fingertip (on the glove, that is!) is cut off, you poke a hole in the tip and slide it over the tube of the bobbin holder before you tie. Once you need it, you slide it up the thread, over the hook eye and wrap it over the material that needs holding. This simple and ingenious trick enables you to tame even the wildest, most voluminous and stiffest material, and holds it well out of the way while you tie on, form a head or varnish.
Once you are done and the thread has been cut, you just pull off the rubber tip.
If you need to remove it before the fly is done, either slide it back onto the bobbin holder or tie a knot on the thread and cut it, and then slide off the rubber tip. Alternatively you can simply cut the tip with your scissors and remove it, but that will of course render the tip useless.

This is a copy of the original Norwgian page about the rubber glove fingertip. The text reads:
Dishwashing Glove Trick
To make fly tying even more enjoyable, the trick with the dishwashing glove fingertip (phew! 24 letters) is one of those little tricks that makes fly tying a bit easier.
When you're trying to make a durable and neat finish on your flies, it's often hard to reach. Hen hackle/deer hair often gets in the way. There are a number of hackle guards on the market, but none of them seem to do the job quite right.
HERE'S HOW TO DO IT:
Poke a hole in the fingertip of a dishwashing glove using a dubbing needle. Slide the fingertip over the bobbin tube. When you're ready to finish the fly, pull the fingertip over the thread and flip it over the fly.

Disadvantages
The disadvantage of the “closed tools” like the rubber tip and the straw or O-rings is that you cannot remove them underway. So holding one material while you tie in another is an option, but then you have to leave the ring there until you are done.
They need to pass over the fly – front or aft – and can’t simply be taken off while tying. For this you need a tool that has a slit or opens.
You can of course remove the hook from the vise and slide a ring over the fly and around the hook bend as described. With the rubber glove tip that will be a little tight.
If you are using drinking straws, you can simply cut the ring and remove it as already mentioned. It’s so cheap that it’s almost free.
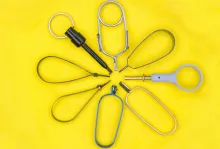
The simple, commercial tools
There’s a handful of fairly simple and inexpensive tools available on the market, which solve this. The most common ones are made from simple, bent metal plate.
One tool is a U-shaped rod with slits in different sizes along one edge. You pass the tying thread through a slit and move the tool on to the material. It can hang there while you carry on tying, and be removed at any time. It pushes back the material, but due to its shape, it doesn’t control the most straggly materials that well. This tool is a little clumsy and doesn’t leave much room when it’s on the fly.

The other model available does a slightly better job there. It’s spoon shaped, and the spoon itself is typically a shallow funnel with a slit from the edge to a small hole in the center. It comes in several sizes so it can be selected to fit the fly and hook size, and thanks to the shape, it offers a bit more control and space.
These two tools are both simple and cheap.
No skimping
Of course we don’t stop at simple and cheap!
I have a couple of tools in my box, which are much more sophisticated. They are also quite efficient and a pleasure to work with.
These particular types of holders aren't easy to find. No brand name fly tying tool makers make them as far as I know. A few have been commercially made over the years and quite a few DIY and hobby based projects have seen the light of day.
There are plenty so called "hackle guards" available, but most are simply slotted plates made to push a dry fly hackle away while whip finishing and varnishing as mentioned above.
The type of tool I'm dealing with does that and much more.

The Danish vet’s tool
Preben Torp Jacobsen was a Danish fly tyer and fly angler – and a veterinarian – whose heritage is still with us here in Denmark in the form of a strong influence on the fly fishing culture and a handful of books, which he authored.
The Crazy Veterinarian as he was known here, devised a small tool made from a bent safety pin, which was at one time picked up by an other grand old man here, Jyde Simon or Simon from Jutland, whose real name was actually Kurt D. Simonsen, who refined it and set it into production.
One advantage of this tool is that it's very fine in materials and also lightweight with limited force in the spring, and that makes it very suitable to harness smaller and more delicate flies.
This tool can be hard to find – even in Denmark – but if you have the wire, some tools and a bit of dexterity, you can make one yourself, which will do what the original does. You can see an example of a DIY-version in the end of this article.

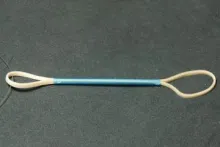
SMHAEN’s tool
Danish Stig M. Hansen makes some really well designed and well thought out tying tools, and his take on the hackle guard – or material guard as he rightfully calls it – is a very nice and simple design, functioning much like the tool covered in the previous section, but made from one stamped out and bent piece of metal plate.
Stig’s tool is angled, which means that it’s out of the way when clamped on the fly, laying along the body of the fly towards the rear. This will give you plenty room to work. It's not quite as delicate as Jyde Simon's wire tool, but pretty close, and can also be used for smaller flies.
It's is a very affordable tool, and well worth looking at if you want a contemporary material clamp. You can find a dealer's list on the SMHAEN website.


Hair clips
For slightly larger flies like pike, bass and salmon flies – or larger saltwater flies – a set of inexpensive hair clips can be a good solution.
These are available in a large range of sizes, and the smallest ones are pretty good fly tying tools, which can even have other uses than being material clamps.
These can be found almost everywhere where you find hair accessories like combs and brushes, and cost next to nothing.
The task can be finding some that don’t have flowers or My Little Pony on them – unless of course that you don't mind flowers or My Little Pony on your fly tying tools.

As an alternative to the hair clip you may find it easier to locate some small bulldog clips. These are usually used to hold together bunches of paper, and can be found in a large range of sizes. The smallest ones, which are typically 1 centimeter or less than half an inch long, can be used for larger flies, but like the hair clips, they won't cut it for smaller flies. The bulldog clamps are not delicate tools, and their force is pretty brutal, so they won't work well on smaller flies with fragile materials.
DIY
It’s not impossible to make your own tool bent from thin steel wire. It might not be quite as good looking, but it’s possible to get close to the wire based designs.
If you use a large safety pin as outset, you get a pre-bent spring. You will need is some pliers to cut off the unwanted point and lock and to bend the rest into a useful shape. A length of spring steel or piano wire can also form the foundation of a DIY-solution. It takes some care and dexterity, but isn’t impossible.
The tool shown here is made by Danish Leif Lumby Henriksen, and is pretty close to Jyde Simon's design and is made from spring steel and heat shrink tube.


Another really simple DIY solution is just plain cardboard or stiff paper or even plastic, like from a plastic binder.
Cut a suitable piece, cut a slit in it and maybe a small hole, and pass it over the thread and materials. It’s not pretty, it’s not sophisticated and not even very efficient. But it’s easy to make and works in a tight spot – and it’s very inexpensive.
- Log in to post comments


What I prefer
Smhaen is by far my preferred here for my needs…Sea Bass and Pike flies. Bulldog clamp is not good, there are always hairs & fibers stocked in . I had used hair clips for a while and still use them when needed, like when Smhaen not large enough for big head flies.